Hanes
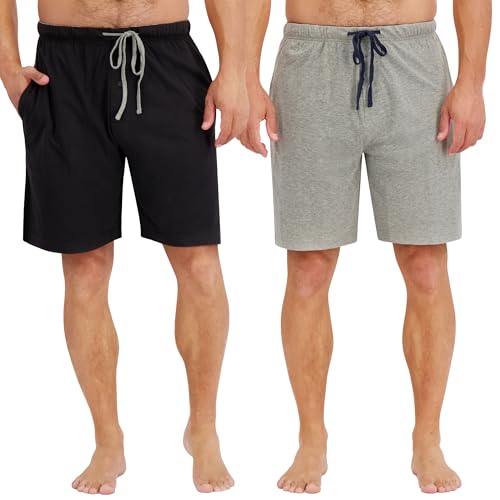
Hanes Cotton Pajama Shorts 2-Pack, 7.5 Inch
The listed 7.5-inch inseam makes these easier to compare for coverage than shorts described only as loose or lightweight.
Check on AmazonThe details / Sleepwear guidance
Look at where material is changing before deciding what kind of wear you have.
A rough patch near the crotch, a translucent area on the inner leg, and a line of separated stitches can all be described as “wearing out between the thighs.” They are not the same observation, and a photograph taken from a distance may hide the difference.
Repeated rubbing is one plausible contributor to localized fabric wear in this area. The useful first task is to distinguish fabric loss, a seam opening, and surface pilling. This guide deals with the garment, not skin symptoms or a medical explanation.
As an Amazon Associate I earn from qualifying purchases.
The listed 7.5-inch inseam makes these easier to compare for coverage than shorts described only as loose or lightweight.
Check on Amazon
A stated 7-inch length, cotton knit construction, drawstring and elastic waistband make this one of the clearer title-level specifications.
Check on Amazon| What you see | Where to inspect next | Useful description |
|---|---|---|
| A broader patch looks more open | Compare resting fabric beside and beyond the patch | Localized thinning on the inner-leg panel |
| A narrow opening follows a stitched line | Examine the stitch path and adjacent material | Interrupted seam stitching with or without nearby fabric damage |
| Small raised balls sit on the surface | Look beneath and around them without removing them | Surface pilling; underlying condition separately noted |
| A sharp isolated hole or pulled loop | Inspect its shape and any known catching event | Localized damage of uncertain cause |
| A lighter patch without obvious loss of material | Compare texture and view in ordinary light | Color or appearance change; thinning not established |
CottonWorks defines abrasion resistance in terms of resisting surface loss caused by rubbing against the same fabric or another material. It identifies factors including the contact material, applied force, fabric tension, and wet or dry conditions. This explains why rubbing is relevant to a wear question without allowing a photograph to reconstruct the exact cause of an individual pair’s damage.
For sleep shorts, the inside leg is a reasonable contact area to investigate. Observe how the garment’s legs and seams meet during your ordinary movements. Do not conclude that your body shape is wrong or that every pair with a similar inseam will develop the same mark. The garment’s cut, fabric, use, and history are not identical across products.
A useful inference is modest: a broad patch in an area you know receives repeated contact is consistent with a rubbing-related contribution. A stronger claim, such as identifying one laundry cycle or one fiber as the cause, requires more evidence. Keep the observed pattern and possible explanation in separate sentences.
Lay the dry shorts flat with the affected area accessible and the material relaxed. Take one photograph showing the whole pair, then a closer view of the inside-leg region. Include a nearby seam or hem in the close view so the location can be understood later. You do not need to stretch the fabric over your hand to make the patch look more dramatic.
Mark the location in a note: left or right leg, distance relative to an obvious seam, and whether the area is on a panel or directly at a joint. State whether it appears on the inside, outside, or both faces of the garment. If both legs show changes, record them separately before comparing their shapes.
Compare with a nearby area of the same panel under the same light. A differently colored section, folded hem, or doubled pocket area is not an equal reference for fabric openness. Even on one garment, the number of layers and direction of the cloth can change its appearance.
Ordinary reflected light is useful for seeing texture and stitch continuity. A gentle backlit view can help you notice differences in openness, but keep the fabric relaxed and compare equivalent areas. A bright light behind a stretched patch can exaggerate a difference and should not be treated as a laboratory measurement.
Record observations such as “more open than the adjacent resting panel” rather than an invented percentage of remaining strength. A visual inspection cannot tell you precisely how much load the fabric can bear or how many wears remain. If the condition is uncertain and you want to keep the garment, that is a reason for professional assessment.
Imagine a pair with small surface pills along the right inner leg and a narrow opening at the left crotch seam. From a distance, both look like general wear. Up close, the right side’s resting panel appears comparable with nearby fabric, while the left side shows interrupted stitching along the joint.
Your note should preserve both findings: right-side pilling without established thinning, and a left-side seam opening whose surrounding fabric needs examination. Removing the pills would not address the left seam. Calling both areas fabric abrasion would lose the information needed to decide the next step.
Now imagine another pair with a broad, visibly more open patch on both inner-leg panels while the nearby seam stitching remains continuous. That pattern gives you a different question: what is the condition of the panels, and is the remaining coverage acceptable for your intended use? A seam-focused solution cannot be assumed to address material loss away from the joint.
These examples are original diagnostic scenarios, not results from wear tests on a named product. They show why separating location, appearance, and function gives a more useful answer than assigning every mark to one cause.
Recall when you first noticed the area and whether the fit, garment use, or care history changed around that time. A useful note might identify a previously comfortable pair that now feels closer through the legs, or a pair used more often for lounging than before. These are possible leads, not proof of causation.
Check whether the affected area is repeatedly pulled taut in ordinary sitting or whether a seam sits directly in a noticeable contact location. If fit is a concern, the leg-opening guide offers a more focused fit assessment. Changing overall size solely to prevent wear is not a guaranteed solution and may create a different fit problem.
Keep the actual care-label history in the record if you seek advice. Do not infer that a garment was mistreated merely because it developed pills or thinning. Appearance changes and durability depend on multiple factors; an individual visual inspection cannot fairly assign blame.
Carry the observed fit issue into the replacement search: identify the leg-room or seam-placement detail you need to investigate. Ask for that information before choosing a Hanes pajama two-pack, an Amazon Essentials sleep-shorts two-pack, or another option in the men’s collection. The Hanes offer on Amazon has no verified abrasion-resistance advantage here. A new candidate should answer your fit question, not promise to eliminate wear.
When surface pills are the main issue, use the pilling guide for its separate care decision. When the garment has a visible seam opening or panel damage, avoid pulling at the area or starting an improvised repair as part of diagnosis. A professional can assess the exact construction if retaining it matters to you.
If the shorts no longer provide the function or coverage you require, consult replacement triage. This guide does not assign an expiration date or rate fabrics by a universal lifespan. Its useful endpoint is a clearer description of what changed, where it changed, and what decision that change now requires.
Not necessarily. Fit and fabric tension can be relevant to investigate, but location alone cannot establish the cause. Examine the actual wear type and assess ordinary movement before drawing a fit conclusion.
No. Pills are attached fiber balls on the surface. Thinning concerns the apparent condition of the fabric beneath or around them. The two can coexist, so inspect both.
No reliable remaining-life number follows from a home visual inspection. Decide whether present function is acceptable and obtain professional assessment if the damage is uncertain and you want to retain the pair.
Inner-thigh wear becomes easier to assess when you separate the panel, seam, and surface. Map the change without stretching it, keep rubbing as a possible explanation rather than a proven diagnosis, and let the actual loss of function guide repair assessment or replacement.
As an Amazon Associate I earn from qualifying purchases.
The listed 7.5-inch inseam makes these easier to compare for coverage than shorts described only as loose or lightweight.
Check on AmazonA stated 7-inch length, cotton knit construction, drawstring and elastic waistband make this one of the clearer title-level specifications.
Check on AmazonThe details
Inspect the surface before removing anything from it.
The details
Replacement is a function decision, not a birthday assigned to every garment.
The details
A long inseam and a roomy opening solve different problems.