
Hanes
Hanes Originals Comfywear Sleep Shorts 2-Pack
This is the standard Originals Comfywear two-pack, kept distinct from the separately named Supersoft 3.25-inch model.
Check on AmazonThe details / Sleepwear guidance
The small attachment points can matter more than the broad fabric panel.
Run your hand across a pair of sleep shorts and the body fabric may feel perfectly pleasant. Turn them inside out and you may find a stiff label corner, a thick seam crossing or the back of decorative trim in the exact place you notice when reclining. An inside-out inspection makes those details visible before a broad softness description decides the purchase.
As an Amazon Associate I earn from qualifying purchases.
This is the standard Originals Comfywear two-pack, kept distinct from the separately named Supersoft 3.25-inch model.
Check on Amazon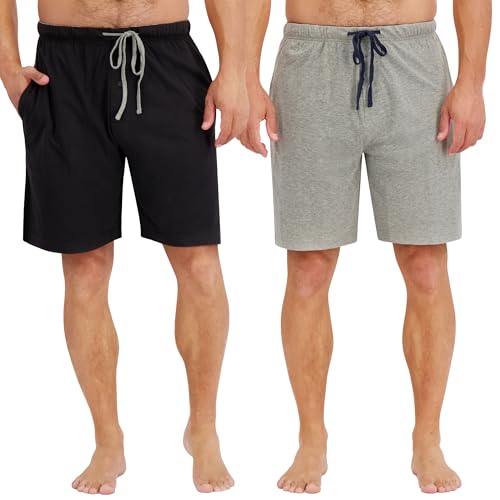
The listed 7.5-inch inseam makes these easier to compare for coverage than shorts described only as loose or lightweight.
Check on AmazonIf you already own the shorts, locate the bothersome point while wearing them. Is it at the center back, a hip, the inner leg or the hem? Then remove the shorts and turn them inside out without losing track of front and back. Match the location to a component. This keeps you from blaming every seam when one label attachment is the actual issue.
For a new pair, inspect the whole inside before trying it on. You are looking for changes in thickness or texture that deserve attention, not proof that the garment will bother you. A seam that feels prominent between your fingers may sit away from your body in wear. A tiny corner may land directly under you. Location and construction have to be considered together.
Use ordinary touch and good light. There is no need to rub aggressively, scrape edges or stretch seams to their limit. Those actions can change the garment and do not resemble how you will wear it. A careful visual and fingertip pass is enough to build a useful map of the interior.
Begin at the inside center back. Look for a fabric label, printed information, a joined elastic section or a casing seam. Follow the lower edge around the waist, noting where additional layers enter from pockets or front closures. Then inspect the top edge and any fold. The aim is to find local differences that a front photograph would miss.
Where elastic is enclosed, the casing hides part of the band but still has seams and joins. Where elastic is exposed, its edge and surface are visible. Neither arrangement guarantees a particular feel. Compare the exact edge that will contact you rather than deciding from the words covered or exposed alone.
If there is a drawstring, feel where its openings and anchors sit. An eyelet, reinforced opening or cord knot can be more noticeable than the rest of the waist. Keep that observation separate from whether the band fits tightly. The waistband mechanism comparison helps identify what the cord does; this inspection asks what its attachments feel like.
Trace each side seam downward, then follow the inside-leg seams toward their meeting point. A long seam can be reasonably flat while the point where several allowances meet is thicker. Fold the garment gently so you can see how the layers lie without pulling them apart. Note whether the bulk is distributed or concentrated in a small lump.
Check the hem where it crosses a side seam or slit. Turned edges and seam allowances can overlap there. Decorative piping, lace or ruffles also introduce attachment edges, even if the trim itself looks delicate from outside. Examine the reverse of the feature, because that is the side you may feel.
Pocket attachments deserve their own pass. A bag may be sewn into the waistband and side seam, creating a thicker junction, or a patch may leave a stitched perimeter inside. If the main complaint lies at the hip, compare the position with the pocket rather than assuming the body seam alone is responsible. The pocket-bulk guide follows that construction in more detail.
Tagless is commonly used to describe the absence of a conventional attached label at a specified location. Information may instead be printed, and other labels may still appear elsewhere. Verify what the seller means for the exact garment. The word does not establish the absence of care labels, waistband joins, pocket seams or hem stitching.
Seamless is a separate construction description and can itself need context. A garment may omit one kind of body seam while retaining other joins and finishing. Inspect the remaining edges rather than treating the word as a promise that nothing can be felt. Your useful requirement might be “no attached label at center back,” which is more precise than searching for every possible seam to disappear.
A printed label can also have a surface you notice, while a small fabric label can lie unobtrusively on another person. You do not need to rank those options universally. Determine which location and attachment method work for you, then seek clear evidence of that feature on the next pair.
| Area | Look for | Follow-up in wear |
|---|---|---|
| Center-back waist | Label corners, print, band join | Does it land where you rest on your back? |
| Side waist | Pocket and waistband layers meeting | Is the point noticeable when lying on that side? |
| Crotch intersection | Several seam allowances crossing | Does ordinary movement make the crossing prominent? |
| Hem and slit ends | Folded layers, reinforced stitching, trim backs | Does the edge remain acceptable with a bent knee? |
| Label attachment | Separate stitches or shared structural seam | Is the label itself the identified problem? |
If you want to compare interiors without decorative hems dominating the question, begin with the Hanes women's Originals sleep shorts or the Hanes men's pajama shorts in the catalog. The retrieved titles identify sleepwear, while the inside label placement still needs a close-up. On the selected women's Amazon listing, seek an interior view or ask specifically about the center-back label.
Once you know the contact point you want to avoid, use the sleep-shorts collections to narrow the cut and fabric you already prefer. You do not need to change all of those preferences just because one old pair has a troublesome label corner. A focused question about the attachment is more likely to find a useful replacement.
Imagine Morgan is deciding between two hypothetical shorts with equally pleasant body panels. Pair A has a conventional label at center back with a firm corner. Pair B uses printed information there but has a thick pocket attachment at the right hip. Standing, both seem acceptable. Lying on the back makes A's label noticeable; lying on the right side makes B's pocket junction noticeable.
Morgan usually rests on the back while reading and rarely lies on that side. That use may favor B, provided the print and remaining construction are acceptable. Another wearer who mainly lies on the right side could make the opposite decision. The fabric's initial hand-feel has not changed; the relationship between construction and position has.
Now suppose A's label is sewn into the same line that closes the waistband casing. Cutting or unpicking that stitching would involve more than detaching a label. Recognizing the shared attachment changes the sensible next step: evaluate a different garment or seek a competent alteration assessment rather than assuming all labels can simply be removed without affecting construction.
Preserve the garment's care and identification information, for example with a clear photograph, before considering a label change. The FTC care-label guidance treats the finished garment, including its trims and fasteners, as the relevant item for care instructions. A body-fiber guess cannot replace that information.
Look closely at how the label is attached. A separately sewn label and one caught in a structural seam present different situations. Cutting the fabric label near its base can leave a short edge that is more noticeable than the original label. This article does not prescribe an alteration; the inspection should first establish whether the label is actually the source of the complaint.
For a newly purchased pair, retain its condition while deciding whether to keep it and follow the seller's applicable return terms. Modifying the garment before the try-on decision can remove the simplest option. The practical goal is a comfortable pair, not a project to eliminate every visible stitch.
If the pair passes, remember the specific construction that helped: a label away from the back resting point, a flatter seam crossing, or a hem without a thick trim junction. Those observations travel better than a general statement that a fabric is soft. They also keep your next question to a seller short and answerable.
If the pair fails, note the exact component and position: for example, “center-back label corner while reclining.” That is the detail to check in an inside photograph of the next candidate.
Not necessarily. It may refer to a particular attached label, often at the waist, while care information or another label remains elsewhere. Verify the exact garment and inspect the full inside.
No. Location, intersections and nearby trim still matter. A seam that lies flat in the hand may sit at a point you notice in a particular lying position.
First confirm that the tag is the source and preserve its care information. Check whether it shares structural stitching; cutting can leave a short edge, and altering a new pair can affect your return options.
Inspect the inside at the places your body actually rests. Choose the label placement, seam intersections and trim edges that work for you, and keep tagless claims separate from the garment’s remaining construction.
As an Amazon Associate I earn from qualifying purchases.
This is the standard Originals Comfywear two-pack, kept distinct from the separately named Supersoft 3.25-inch model.
Check on AmazonThe listed 7.5-inch inseam makes these easier to compare for coverage than shorts described only as loose or lightweight.
Check on AmazonThe details
Inspect the pocket you lie on as carefully as the pocket you fill.
The details
Find out what holds the shorts up and what you can adjust.
The details
A calm first inspection helps distinguish a wrong item, an observable defect, and a fit preference.
The details
An opening, a closure and a decorative front are three different details.
The details
Count the layers you wear, then find where each one is attached.
The details
Look beneath the fuzzy surface and compare what is actually against you.